
I know what you’re thinking. Why in the world is Megan teaching me how to create my own blog graphics? She’s a designer—doesn’t she want my business?
Well, you know this ancient proverb, right?
“Create blog graphics for a client and you make her happy for a week or two; teach her to create her own graphics and you make her happy for a lifetime.”
Those ancients were ahead of their time :)
So sure, you absolutely can hire me to create blog graphics for you. But if you’d rather DIY, Canva makes it easy for non-designers to create professional-looking images.
If you haven’t heard of Canva, it’s a free online graphic design tool. It has a ton of templates and millions of images available (most cost $1; some are free) to help you create graphics for your blog, social media platforms, eBooks and more.
I typically use Photoshop and Illustrator to create my images, but I’ll be the first to admit those programs have a steep learning curve—and they’re pricey. So Canva is great for non-designers on a budget.
For the purposes of this tutorial, I wanted to see if I could recreate one of my blog images in Canva. You can follow the same steps to create your own blog graphic template.
WHAT YOU’LL NEED TO CREATE BLOG IMAGES IN CANVA
Before you get started, you’ll want to have this info at your fingertips. It seems like a lot, but it will save you time once you’re in Canva.
- Your graphic dimensions. Pro tip: To avoid looking like an amateur, all of your blog graphics should be the same width—ideally the width of your content. My dimensions are 1080 x 1080.
- The hex code of your brand colors. If you’ve worked with a designer, those were most likely provided to you. If you don’t know what the hex I’m talking about (see what I did there?), a hex code is a six-digit series of letters and numbers used in HTML and CSS to represent colors. Hot pink, for example, is #f00e46. You can use a color picker to figure out your brand hex codes, or if you just can’t be bothered, you can eyeball the colors in Canva and pick something that looks right (*shudders* please, PLEASE don’t!). Or just stick with classic black and white.
- Your brand fonts. You most likely use 2-3 fonts on your site, so write those down. Canva has many fonts available, including Google fonts. Paid fonts won’t be in there—I’ll talk about your options when we get to that below.
- A blog graphic template (optional). To achieve a cohesive-looking brand, you’ll want your graphics to have a consistent look. Canva provides professionally designed templates that are a great starting point. However, if you want something truly unique to your brand, I can create 1-3 background templates for you.
- A Canva account. It’s free to sign up. Go ahead, I’ll wait.
HOW TO CREATE A TEMPLATE FOR YOUR BLOG GRAPHICS
As I mentioned above, for this tutorial I’m going to recreate one of my own blog graphics: the blog header graphic. Canva automatically saves your project as you work on it, so you don’t have to worry about losing your work. Also, you can copy projects, so after you create your first blog graphic, you can make a copy and modify it for future posts.
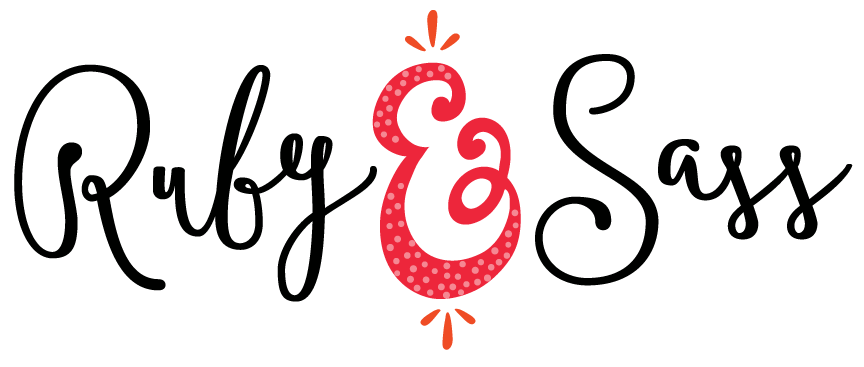
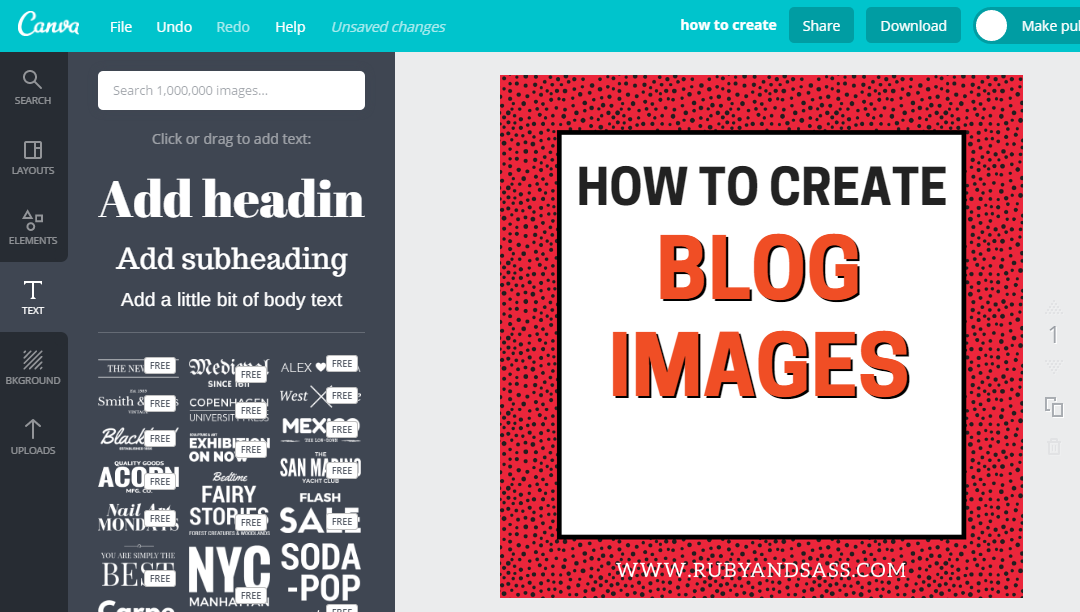
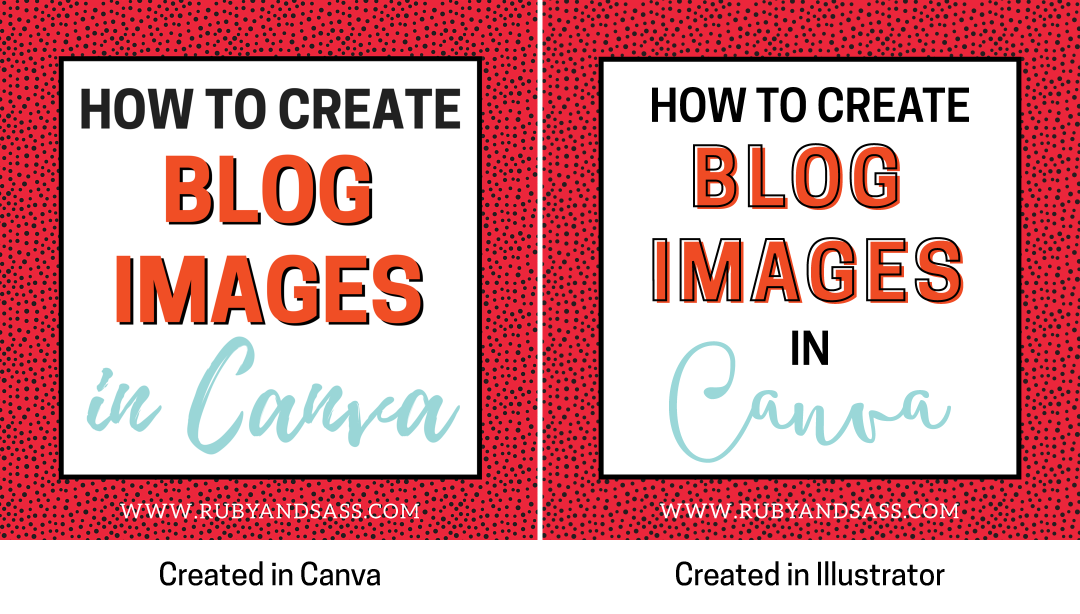
First, here is what I’m going to attempt to recreate:
Instructions
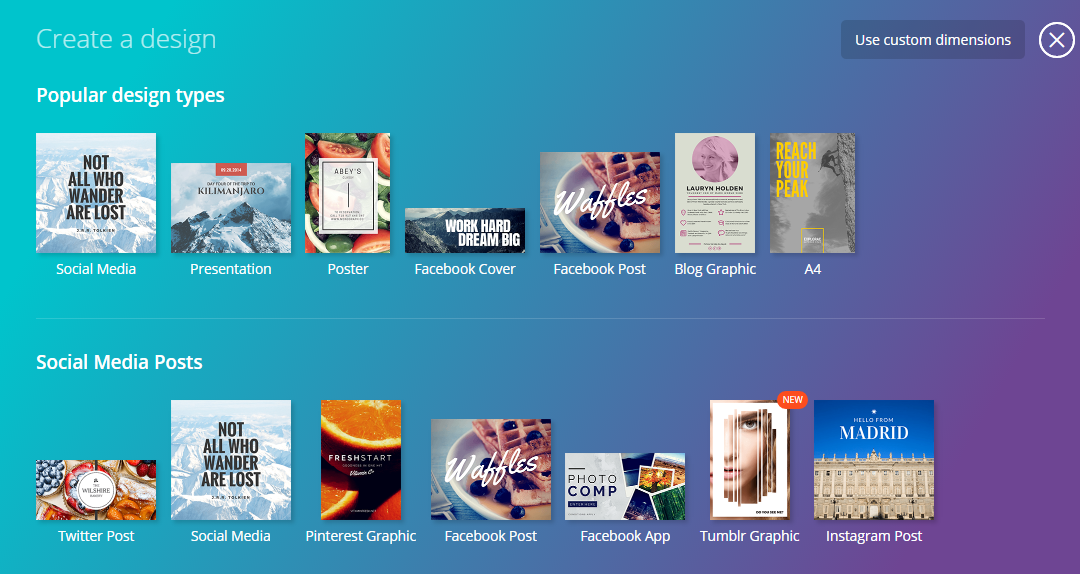
1. Have your blog image dimensions handy? On the Canva home page, click Create a design. Select the template for the design that has the right dimensions for your blog image (hover over them to see the dimensions). That might be the one that says Blog Graphic—but it might not. My dimensions are 1080×1080, so I’m going to click the design that says Instagram Post. If none of them have the correct dimensions, click Use custom dimensions in the upper-right-hand corner and enter the dimensions you need.
2. You’ll be taken to the Canva workspace (aka “Where the magic happens”). Your blank canvas is on the right; menu options are on the left

3. If you are going to use a Canva template, you can select one from the left-hand column. You can still customize it by changing the image and fonts.
4. I want to use my own branded background, so the first thing I’m going to do is upload it using the Uploads button. (You can upload .png and .jpg files.)
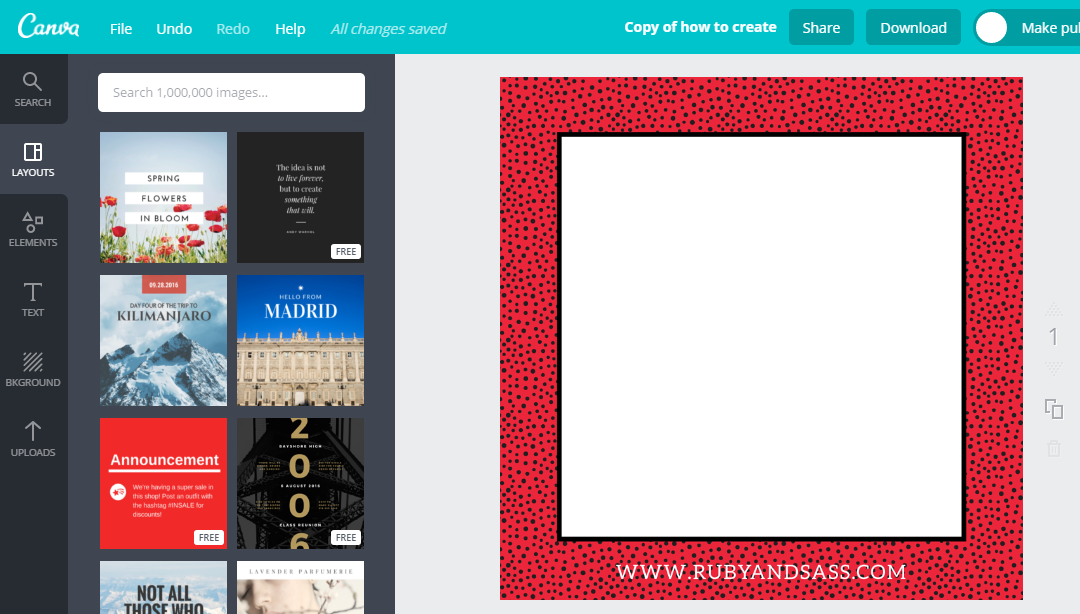
5. As you can see, uploading this pre-designed background saves me a couple steps. I don’t have to create a white square on top of it (although I could by clicking Elements>Shapes and modifying a square), and I don’t have to type in my web address every time.
6. Now I need to enter the title of this blog post. To do that, I click Text in the left column and select Add heading. It puts a text box smack dab in the middle of my graphic, so I have to drag it up toward the top. To move text, hover around the text box until the cursor turns into a crosshairs, then click and drag the text box to its desired location. A vertical dashed line will appear when it’s centered.
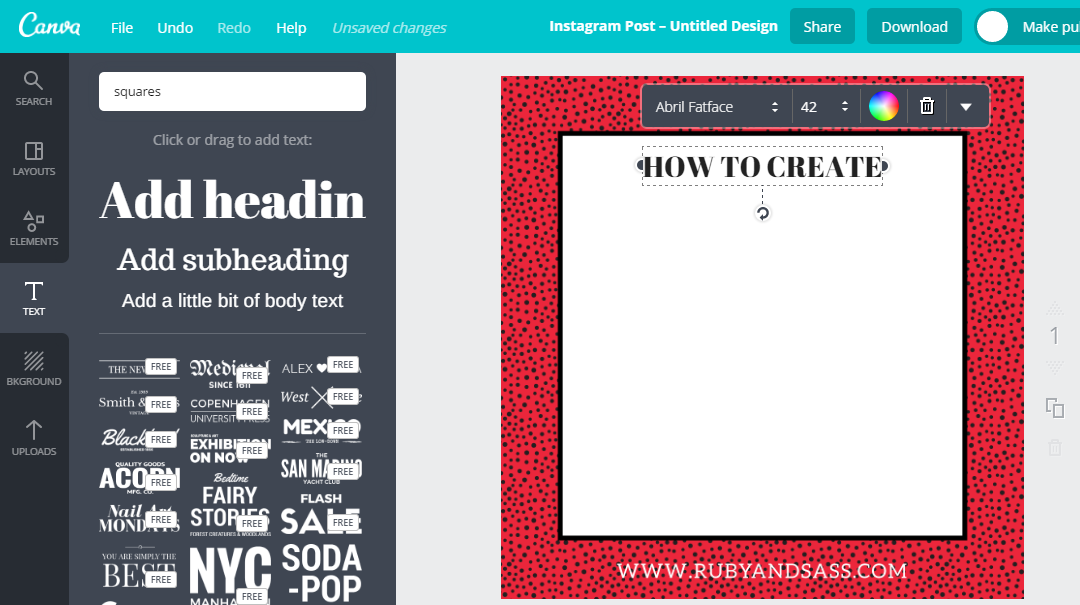
7. I click in the text box, delete the “Add heading” text, and type the text I want in the first line (“how to create”).
8. I still need to tweak the font type and size. To change the font, I click on the drop-down list next to Abril Fatface and select Cooper Hewitt. To change the size, I click on the drop-down list next to 42 and select 72. Yep, I like big fonts and I cannot lie. Tip: Additional text formatting options are available under the arrow on the right as shown below.

9. I repeat steps 6-8 for the second and third line of text. I use Cooper Hewitt for the second line of text as well, but I can’t exactly recreate what I do in Illustrator because Canva doesn’t differentiate between stroke and fill color – it’s alllll one color (boo!). I have to come up with something close instead. (If you’re curious, I create the “Blog Images” text in black, copy it, change it to my branded orange and offset it using the arrow keys to create the drop-shadow effect.)
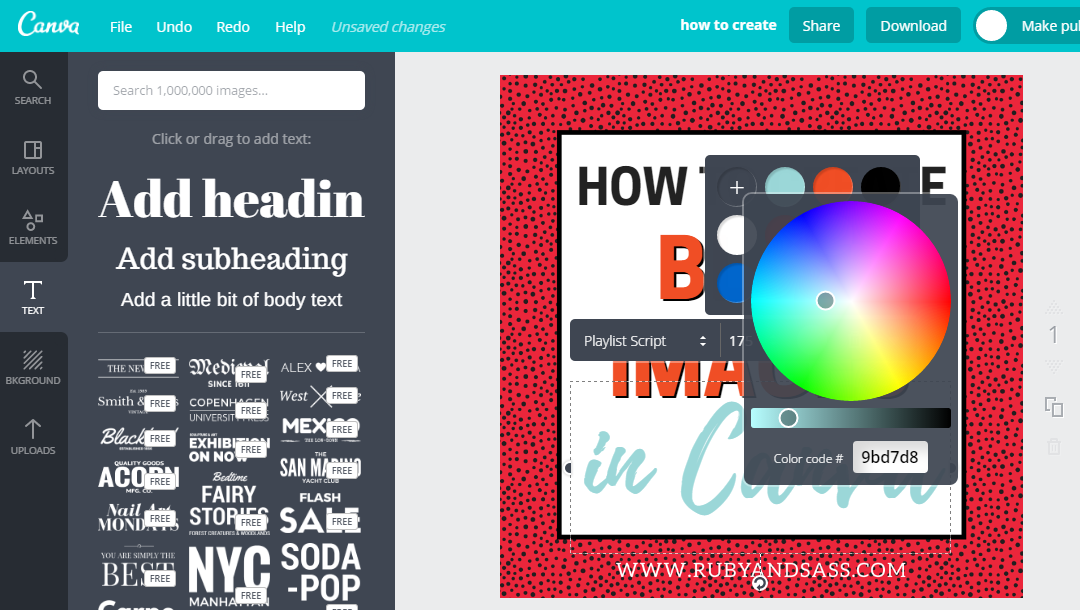
10. For the final line of text, I typically use a paid font that’s not available in Canva. If you use the paid version of Canva, Canva for Work, you can upload your own fonts. But since I’m using the free version, I’m just going to pick a font that looks similar (Playlist Script).
11. I need to change the color to my brand’s light blue. To do that, I click on the color circle in the floating toolbar, then click on the plus sign to add the hex code.
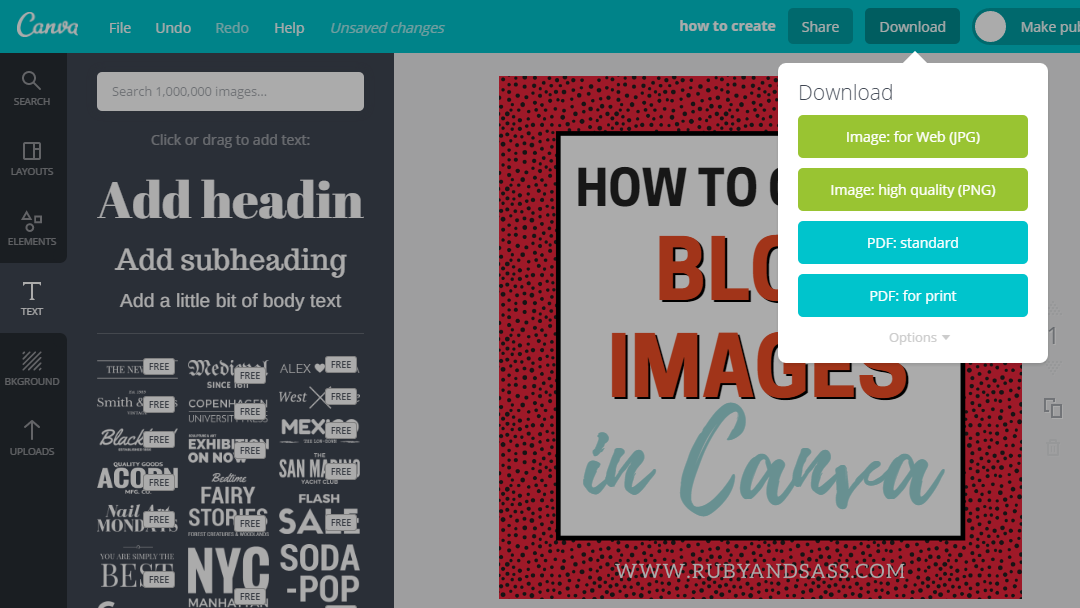
12. Once I’m satisfied with the text placement, I’m pretty much done. I just need to download the file. I click Download in the upper-right and select the PNG option. I recommend PNG files for graphics like this one and JPEGs for photo images. Note: If you’ve used elements that weren’t free, like a $1 photo or background image, you’ll have to pay at this time.
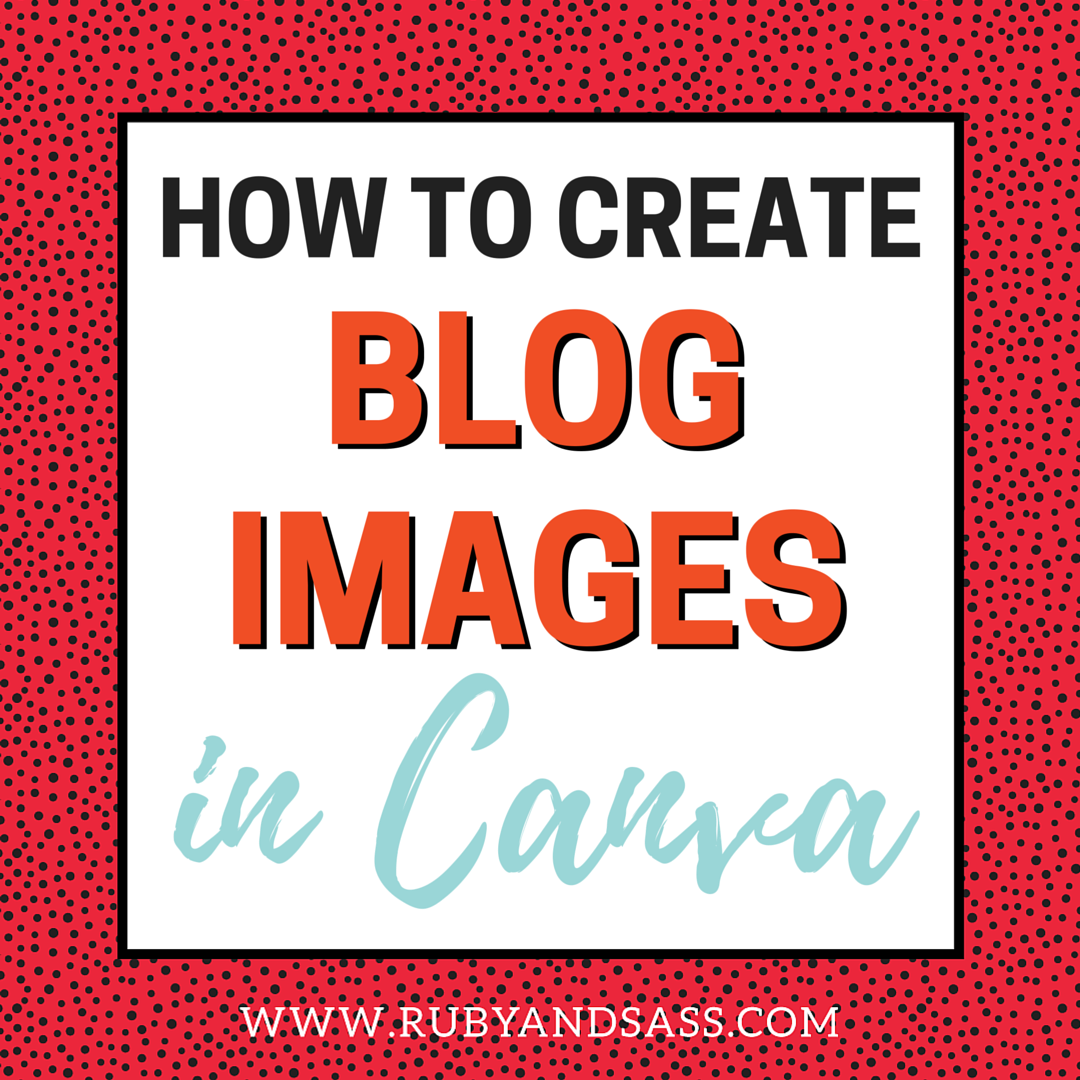
13. We’re done, wahoo! The only thing left to do is post it to my blog!
Remember, Canva saves all your projects, so the next time you need to create a branded image, you can copy this, change the text, and be on your way! Not too shabby.
And here’s the side-by-side comparison – not bad for a free tool!
 If you want to use Canva to create custom, branded blog graphics, I’d be happy to create 1-3 background templates that you can upload. I’ll make font recommendations, too.
Do you use Canva? I’ll be happy to answer any questions in the comments!
This Canva looks pretty cool! Having a free tool is great, especially one that doesn’t have the learning curve of Photoshop, Illustrator, etc.. Not only do you need to know how to design (i.e. be skilled in visual arts), but you need to know how to use the program (i.e. be skilled in computer arts) to be able to do what you do in Illustrator. I’ve only got skill in one of those areas (and it’s not visual arts), so I can’t really do anything other than minor photo retouching in Photoshop, so I might have to give this Canva a try! Thanks for demoing it for us.
Glad to introduce you to it! It’s really great for a free program. Enjoy! :)